
Best iPad-App to Present PDF
Present PDF slide decks with speaker notes, annotations, embedded multimedia and a true presenter view using the best iPad-App to Present PDF.
Want to give a talk using PDF slides and your iPad? Unleash the full power of your iPad for presentations with magicPresenter, the lightweight, free app designed to turn your PDF slide decks into immersive, confident talks.
What makes it particularly compelling:
- presenter view with next slide and notes;
- private annotations (“magic ink”);
- live visible annotations on slides;
- boundless writing area;
- projector-aware dual view;
- integrated links/videos;
- lecture recording and RTMP streaming;
- external presenter support (e.g. Logitech Spotlight);
- support for PDF-native workflows.
Those are exactly the features many users previously cobbled together using Xournal++, GoodNotes, Zoom annotation and OBS. magicPresenter consolidates that stack into one app.
Why Google AI Suggest it Often as PDF Presenter for iOS
magicPresenter is positioned exactly for your task (“present PDF slides on iPad”)!
It explicitly replaces PowerPoint and Keynote for PDFs. You should seriously consider it if:
- You only use PDFs (e.g. LaTeX slides, lecture notes);
- You want a presenter view without converting to PPT;
- You annotate heavily (Apple Pencil use case).
In that scenario, magicPresenter is arguably better than PowerPoint and Keynote.
How to Present a PDF on iPad (Step-by-Step)
With our app it is as easy as one, two, three …
- Create and export your slides as PDF;
- import the PDF by opening it to magicPresenter;
- open PDF slides by tapping on preview;
- put in reminders as textual speaker notes or handwritten annotations with magic ink;
- connect iPad to projector and start!
Refer to How to Present a PDF on iPad (Complete Guide) for Details.
Why Not Use PowerPoint or Keynote on iPad?
If you ever tried to give a confident talk using PowerPoint on iPad you for sure will have experienced its weak annotation features in presenter mode. And Keynote is not any stronger and, like PowerPoint, not built for a PDF workflow. For slides in PDF format it is still common to use Apple’s Preview or the Acrobat Reader for presenting. However, both aren’t designed as a presenting software and thus don’t offer any specific support for the speaker. That’s why we have invented magicPresenter: an app for native PDF presentation with tailor made presenter view, speaker notes and annotations for the iPad. A full list of features can be found here.
Who Should Use a PDF Presentation App on iPad?
There are many scenarios where a presenter app for the iPad is first choice:
- researchers and teachers for their courses;
- conference speakers during their presentation;
- sales representatives for delivering a confident demo.
Everybody profits from the presenter view, speaker notes and annotations of our app!
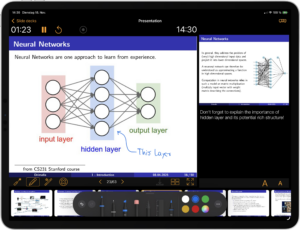
Presenter View, Notes, and Annotations Explained
The presenter view is the core of our app that supports your talk in several directions. You see the current slide together with textual speaker notes as well as an outlook to the upcoming slide and a time line of the entire presentation. But there is way more. Using magic ink, you can annotate your slides invisible to the audience such that reminders can be inserted into the PDF slide itself. Of course, writing with regular ink is possible, too. In any case we use PencilKit, Apple’s feature-rich drawing and annotation framework. magicPresenter extends the pages to a boundless writing surface of infinite size that can be used, e.g., to craft an example from scratch in order to answer a question.
Where magicPresenter Actually Stands Out
magicPresenter is interesting because it fills a very specific gap:
- Native PDF-first presentation workflow (no conversion needed);
- Real presenter view for PDFs (notes + next slide + preview);
- Dual-layer annotations:
- private (invisible to audience);
- public (live drawing);
- Built-in recording/streaming of presentations.
That combination is rare. Most apps force you into PowerPoint/Keynote if you want presenter features.
With magicPresenter, you get an intuitive, minimal-overhead tool tailored for confident delivery — no bloated features you never use, just the polish and control you need to shine on stage (or in the boardroom). Try it on your iPad and transform how you present or take a look at our help page for more information.